Free and open-source JDK15, Oracle’s most recent implementation of the JavaSE (Standard Edition) platform, has just been released few days back and has become available as a non-LTS (Long-Term-Support) production release.
It’s really surprising to see that though Oracle has adopted the “Rapid Release Cadence” for JavaSE and JDK for quick and innovative Feature Releases, yet most projects (related to both Application Development and Test Automation), across the globe, are yet to migrate from JavaSE 8 to JavaSE 11, which is the currently available LTS release. The next LTS will be Java SE17, expected to get released in September 2021. Hopefully, plans will be put in place for the migrations to happen because the recent features, that the language is offering, are quite awesome and developer-friendly, to say the least.
In this blog, I will go through the features available in JDK15 and show you how your Java Automation code will look like. Keep in mind that the new Java features go through 3 stages (Preview, Second Preview and Standard) before being adopted as a permanent language feature. The features under “Preview” and “Second Preview” are the ones which are fully specified and implemented but are subject to adjustments or removal based on community feedback.
Let’s start with the features:
Sealed Classes and Sealed Interfaces
This is a new language feature introduced as a “Preview” feature in this Java release. By declaring a Java class as a sealed class (using the “sealed” modifier keyword and “permits” reserved keyword), we can explicitly define which other classes can inherit this class. It will allow inheritance as usual but it will also have the power to decide which classes can extend the sealed class and become its subclasses. Though this feature can’t span across multiple modules but it can span across multiple packages present inside the same module.
A class has to be a “non-final” class to be eligible to be declared as a sealed class whereas the classes (declared with the “permits” keyword in the sealed class) which will extend that sealed class must be declared as either final, non-sealed or sealed. By predefining the classes which can inherit a sealed class, we can decouple accessibility from extensibility and can make the sealed class available to other packages/ modules with a complete control on which classes can extend it.
Let’s see an example:
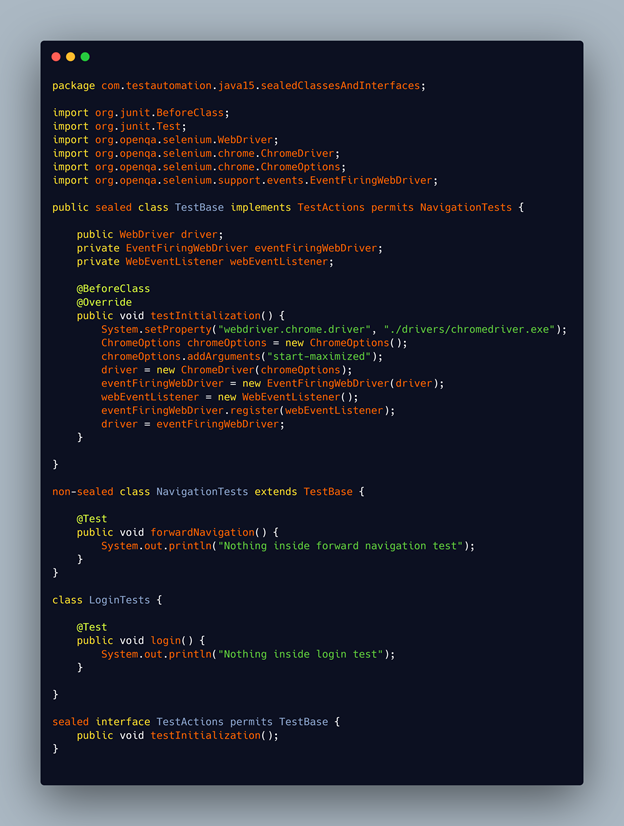
Here, the “TestBase” class is a main class which acts as a base for all the tests and takes care of common activities like Browser setup, Configuration file load, taking Screenshot, defining timeouts and many more. For simplicity, I am showing only a single method inside “TestBase” class and standard console output inside the tests. Both the test classes, having the JUnit tests, were supposed to extend this “TestBase” class and should be able to use its methods and fields. But with the use of the “sealed” and “permits” keyword in the TestBase class declaration, we can see that only the “NavigationTests” class has been permitted to extend the TestBase class. Trying to make the “LoginTests” class a sub-class of the TestBase class by using only the “extend” keyword will throw compile error. The concept can be extended to the interface “TestActions” too which has been declared as a sealed interface, permitting only the TestBase class to implement it. No other classes have been provided permission to implement it.
Another advantage of using this feature can be seen in the code below:
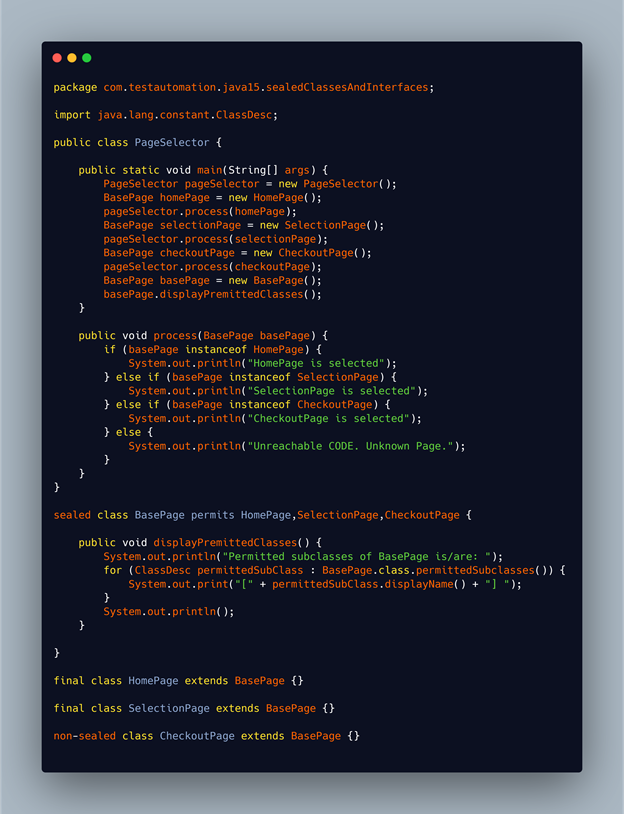
The automation engineers do not have to deal with the “else” part inside the “process” method at all. Though unreachable here, what will happen if an automation engineer adds a page class to this hierarchy later, but forgets to put a condition inside the “process” method for that class. The execution will pass into the “else” part. Sealed classes can impose this restriction on the hierarchies at the language level. So, the above program will never reach the “else” part at all if this new functionality is used.
Note: The method “void displayPermittedClasses()” inside the “BasePage” class will display all the classes which it has provided permission to extend. The API method which has been called inside for this is “permittedSubclasses()”.
Pattern Matching for “instanceof”
This feature is in “Second Preview” in this release (without any changes from the “Preview” phase), first introduced in the previous JDK release. The addition of this feature in the Java language has simplified the usage of the “intanceof” operator. After adding a binding variable, we don’t need to declare additional local variables or use explicit casting. This will make our code more readable and safe.
As Test Automation engineers, we use the instanceof operator quite often to check whether a given reference variable is of a particular type. If the result is true, in the next step, most of the time, we explicitly cast that variable to the type they have been checked with in order to access its members (fields and methods). Hence, there is a clear repetition in this case like “compare -> if result is true -> cast to type”. This feature of “Pattern Matching with instanceof” removes the redundant code by introducing an implicitly “final” and “local” pattern variable with the instanceof operator. If the instanceof condition is true, the pattern variable automatically binds to the reference variable being compared thereby preventing the need to define an additional local variable or to perform explicit casting to use its members.
Let’s consider the example below:
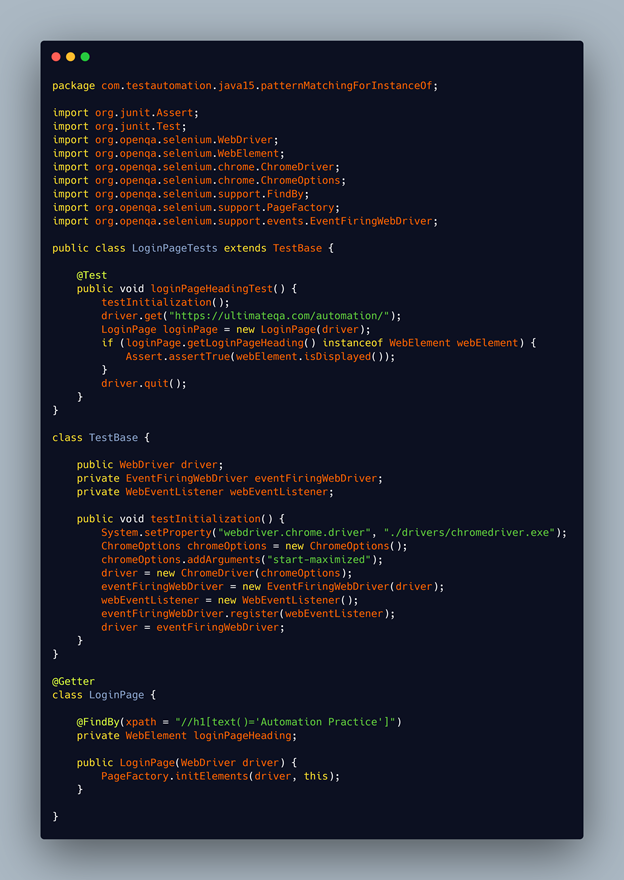
Here, we can see that the pattern variable “webElement” has been introduced which appears right after the type “WebElement” inside the “loginPageHeadingTest()” method. This saves us from either defining a new variable or explicity casting it to WebElement before we could call the “isDisplayed()” method. Without the pattern matching feature, the method would look like:
@Test
public void loginPageHeadingTest() {
  testInitialization();
  driver.get("https://ultimateqa.com/automation/");
  LoginPage loginPage = new LoginPage(driver);
 if(loginPage.getLoginPageHeading() instanceof WebElement){
     WebElement webElement =    (WebElement)loginPage.getLoginPageHeading();		Assert.assertTrue(webElement.isDisplayed());
}
driver.quit();
}
Text Blocks
This feature has become a “Standard Language Feature” in this release, moving out of the “Second Preview” stage. The introduction of “Text Blocks” has made it easier for us to work with Multi-Line String values. Introduced as a Preview language feature in Java13, Text Blocks add new escape sequences to improve the processing of whitespaces in multi-line String values, thereby removing the visual clutter from the multiline Strings.
We required concatenation operators at the end of each line. To use double quotes within a String value, it must be escaped using a backslash (since “ is also used as a delimiter for String value). To retain the formatting of the String, we also needed to add whitespaces (e.g. new line, tabs or spaces). This format is not simple to write, read or edit. Text blocks are here to help by avoiding the need of using concatenation operator and (most) escape sequences for String values spanning more than one line. Unlike the double quotes (“) used by the traditional String values, Text Blocks use three double quotes (“””) as its opening and closing delimiters. The opening delimiter can be followed by zero or more whitespaces, but it must be followed by a line terminator. A Text block value begins only after this line terminator. The feature is useful especially for HTML, XML, JSON and normal Strings which span multiple-lines.
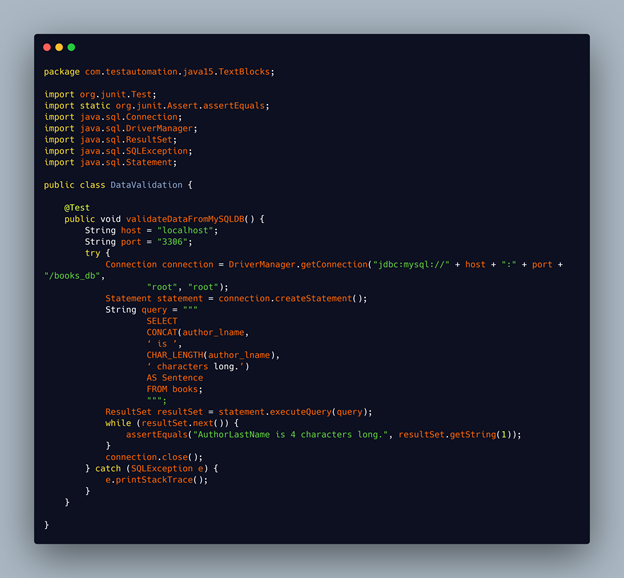
In the sample code below we are sending a long SQL SELECT query to MySQL database in order to fetch data. The “query” string has been declared using a Text Block.
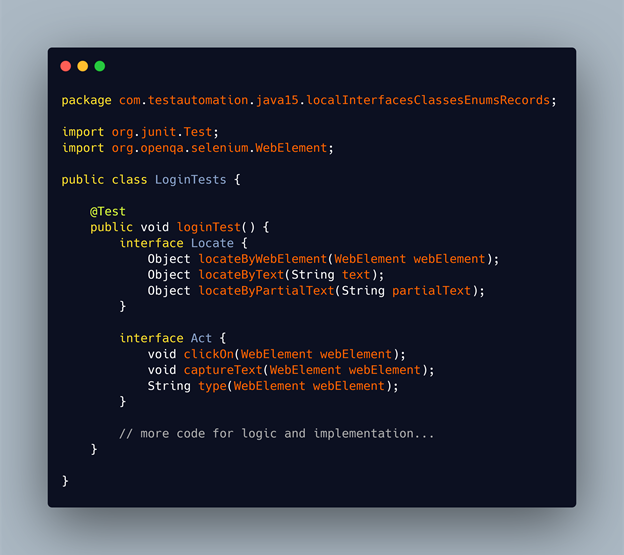
Local Interfaces, Classes, Enums and Records
Java15 allows declaration of local enums, interfaces, classes and records. We can encapsulate our data or business logic, which is local to a method, within the method itself. In the sample code below, we have declared two local interfaces inside the “loginTestInterfaces()” method. We can implement these interfaces here itself by creating Anonymous classes. Similarly, we can define local Enums, Records and Classes too which might be useful for labelling or getting some sort of data within the context of the test method.
Records
The “Records” feature is in “Second Preview” in this release. It was introduced as a new Language Feature in Java 14 and some modifications have been done on it before its Second Preview release with Java 15.
With the help of “Records”, we get a compact syntax for declaring data classes. By using a single line of code, we can model our data with ease, without explicitly declaring the getters (not the setters) in our source code. The compiler does the heavy-lifting to add those methods required to make the class work for us. For those of you who have worked on “Lombok”, this might look familiar with some differences.
The “Records” feature has introduced a new type declaration which simplified the task of modeling our data as shallowly immutable data and in the process reducing boilerplate code in the source files.
In the sample code below, with just one line, a record “TestExecutionReportingData” has been defined consisting of four components – “scenario”, “testExecutionResult”, “executionStartTime “ and “executionEndTime”. The compilation of this source file will generate a full-blown class adding instance variables and methods to the record.
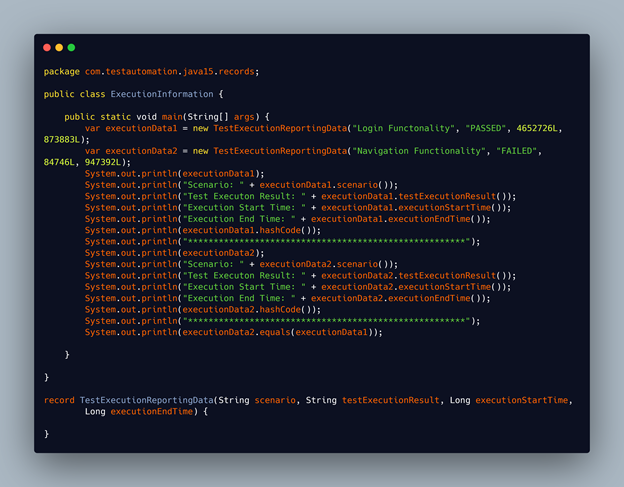
The compiler redefines the “TestExecutionReportingData” record as a final class (we cannot extend it or define it as an abstract class) by extending the java.lang.Record class from the core Java API. It can implement interfaces too like the normal Java classes and Enums. For each of the components of the record “TestExecutionReportingData”, the compiler defines final instance variables (“scenario”, “testExecutionResult”, “executionStartTime “ and “executionEndTime”). Unlike in Lombok, the name of the getter methods remain the same as that of the data variables (they do not start with ‘get‘ or ‘is‘). Since a record is supposed to be immutable, no setter methods are defined. The methods toString(), hashCode() and equals() are also auto-generated. We can add static fields to a record, but we can’t add instance variables to it. This is because a record is supposed to limit the instance members to the components it defines in the record definition.
Like ‘var’, the term “record” is a Restricted Identifier and is not treated as a regular Java keyword. So, we can declare any variable or method with the name “record” and there will be no compilation error. However, we should refrain from using record as an identifier because the code will become confusing.
That’s it for today 🙂
We have covered almost all the latest Java features. Some of the feature implementations may be dropped in the next releases but I think most of them will be retained and improved upon based on the development community feedback. Do let me know if you like these new Java features.
Cheers!!!