As software engineers, most of the time we are working with the web browsers like Chrome (from Google), Firefox (from Mozilla), Edge (from Microsoft), Safari (from Apple), etc. A web browser is nothing but software that loads files from a remote server or a local disk and displays them to us on our window screen. The testers are testing the web applications in different browsers, as well as the developers, are creating applications and checking them in the browsers. But how do the different browsers render the web pages? In this blog, I will deep dive into the stages and the processes performed by the browsers to display a webpage.
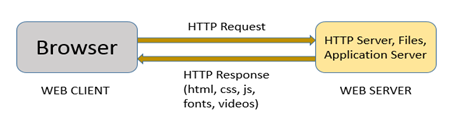
For web applications, the web client (e.g. browser) sends HTTP (HyperText Transfer Protocol – a textual and stateless protocol) request to the correct web server (can be a static web server or a dynamic webserver) after finding the IP address of the hosted website from the DNS (Domain Name System). The server accepts the request, processes it, finds the requested documents, and responds to the client by sending the requested hosted files (which can be HTML, CSS, JavaScript, Images, Fonts, Videos). If the server is not able to find the requested document(s), it sends a 404 HTTP response.
The HTML file sent by the server in bytes is in “binary format”. It is a text file having the response-header message as “Content-Type” with value “text/html; charset=UTF-8”. This value tells the browser that the file is a Media Type (formerly MIME Type (Multi-purpose Internet Mail Extensions))” HTML document with character encoding set to the Unicode-based UTF-8 format. The browser then converts the received raw bytes of the file data into characters (using the defined character encoding) which in turn is converted into tokens which are then converted to nodes.
For demo purpose, I have created a sample HTML document whose structure looks like below:
<!DOCTYPE html>
<html>
<head>
<title>Sample App</title>
<link rel="stylesheet" type="text/css" href="style.css">
</head>
<body>
<div id="inputForm">
<h1>This is a Sample Login Form</h1>
<div class="inputElement">
<label class="inputLabels" for="firstName">First Name</label>
<input type="text" id="firstName" placeholder="Enter your first name here" autocomplete="off">
</div>
<div class="inputElement">
<label class="inputLabels" for="lastName">Last Name</label>
<input type="text" id="lastName" placeholder="Enter your last name here" autocomplete="off">
</div>
<div class="inputElement">
<label class="inputLabels" for="age">Age</label>
<input type="text" id="age" placeholder="Enter your age here" autocomplete="off" maxlength="2">
</div>
<div class="inputElement">
<label class="inputLabels" for="city">City</label>
<input type="text" id="city" placeholder="Enter your city here" autocomplete="off">
</div>
<div >
<button id="submit">Submit</button>
</div>
</div>
</body>
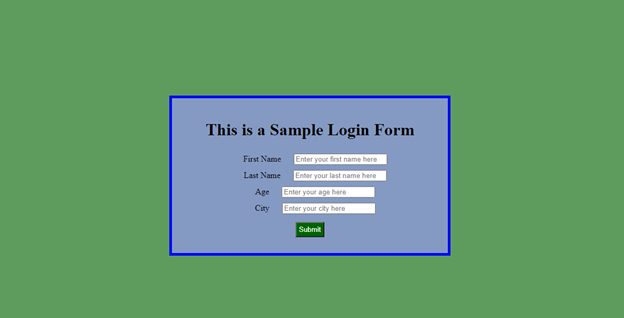
</html>When rendered in the browser, the page looks like:
The associated CSS (in style.css file) looks like:
body{
    background-color: rgb(93, 156, 93);
}

#inputForm{
    text-align: center;
    border: 5px solid blue;
    padding: 20px;
    margin-top: 200px;
    margin-bottom: 200px;
    margin-left: 400px;
    margin-right: 400px;
    background-color: rgb(133, 154, 194);
}
.inputLabels{
    padding: 20px;
}
.inputElement{
    padding: 5px;
}
#submit{
    background-color: darkgreen;
    color: white;
    padding: 5px;
    margin: 10px;
}
Before understanding how the browser is rendering it, let’s first understand the following terms:
1) DOM (Document Object Model)
2) CSSOM (CSS Object Model)
3) Render Tree
DOM (Document Object Model)
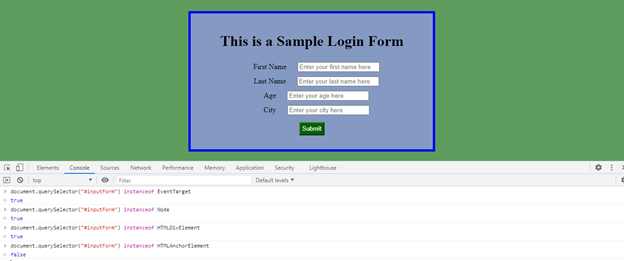
DOM or Document Object Model is a Web API provided by the individual browsers to render a webpage and to allow the developers to dynamically manipulate the elements for different purposes. When the browser reads an HTML document and the tokenization process is complete, it converts all the HTML elements (e.g. in our document – html, head, body, title, link, body, div, h1, label, input, button) into individual JavaScript objects called “Nodes” from different predefined JavaScript classes (constructor functions). Different DOM nodes have different properties. For instance, an element node corresponding to tag <a> has link-related properties, and the one corresponding to <input> has input-related properties. Each DOM node belongs to a corresponding built-in JavaScript class and all the classes of DOM nodes form a single hierarchy. The root of the hierarchy is the built-in, abstract “EventTarget” root class, which is inherited by the built-in “Node” class and all the other DOM Nodes inherit from this “Node” class. Some examples of these other built-in classes are HTMLHeadElement (for <head>), HTMLBodyElement (for <body>), HTMLDivElement (for <div>), HTMLInputElement (for <input>), HTMLLabelElement (for <label>), HTMLButtonElement (for <button>) etc.
Let’s test this inheritance for our HTML in the browser console:
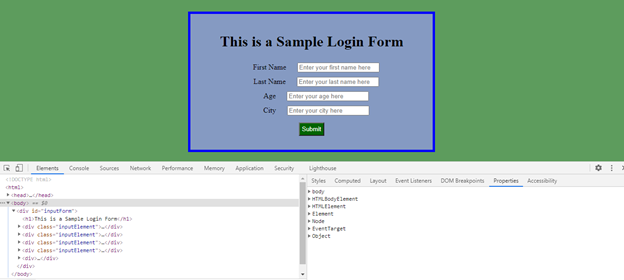
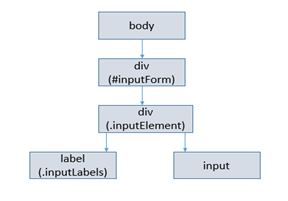
After the node objects are created, the browser creates the below tree-like hierarchy (known as DOM Tree) with the node objects to efficiently render and manage the document. The DOM Tree is created not only for the HTML elements but also for comments, attributes, text present in the HTML document but as separate nodes.
For our sample HTML document, the DOM Tree looks like below:

You can see a high-level view of this DOM tree (with properties of each DOM element) if you try to inspect elements and open the “Elements” tab in the Chrome DevTools.
CSSOM (CSS Object Model)
To make our webpages more appealing, we add CSS (Cascading Style Sheets) to our HTML documents. The CSS I mentioned before has been used to style this HTML document that I have created. Though I have used a separate file (style.css) in this case, CSS can also be added by embedding in the HTML document itself by either using the <style> tag, by using the “style” attribute with the elements (inline) or by using JavaScript.
After creating the DOM, the browser then starts reading the CSS file(s) and creates another tree hierarchy which is called CSSOM (CSS Object Model). In the CSSOM, again nodes are created and each node contains style information for the target DOM elements, specified by the attached CSS selector.
Note: Nodes are not created for those elements which cannot be printed on the webpage e.g. <meta>, <title>, <link>, <script> etc.
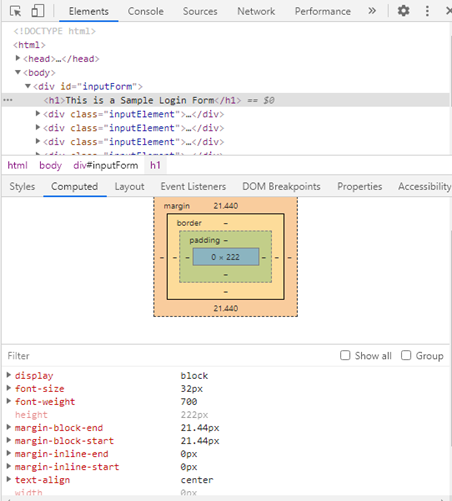
By default, the browsers have a parent stylesheet (known as User Agent Stylesheet) which provides default values for most of the CSS properties (if any property is not defined by the browser, then it follows the W3C CSS standard). The values for these properties get overridden by that of the CSS specified by us (using the CSS Specificity Rules) before the CSSOM is created by the browser. The browser creates this CSSOM to compute the styles based on the CSS Cascading rules. Below is the computed style of the element with the <h1> tag.
The CSSOM for our CSS looks like:
Render Tree
After the browser finishes creating the DOM and CSSOM, it starts creating another tree, called the “Render Tree”, by combining the DOM tree and the CSSOM tree. It creates this tree to calculate the layout of the visible elements and to eventually paint them on the window screen by placing the nodes and their children nodes (which should be visible) in a pixel matrix. Note: Nodes having the property “display:none;” will not be present in the Render Tree and nodes having the property “visibility:hidden;” will be present in the Render Tree though it won’t be visible on the screen.
The Rendering Sequence in the browser
At first, the browser performs the “Browser Reflow” process for each node present in the Render Tree bycalculating its layout information and creating the layout for that node. This layout information consists of each node’s size/dimension (in pixels) and the screen position at which it will be printed. This reflow process can get triggered when you
- Insert, remove, update an element in the DOM
- Move or animate a DOM element
- Modify some content in the document
- Change a CSS style or className of an element
- Add or remove a stylesheet
- Scroll or resize a window
This reflow process, in turn, will also trigger further reflows on that element’s children, ancestors, and elements that appear after it in the DOM.
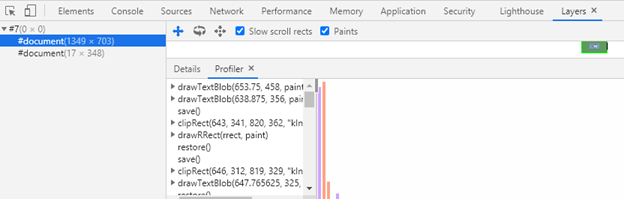
The browser then creates bitmap images (called “Layers”) for the elements in the Render Tree which helps it to paint the elements in the correct specific stack order (along the z-axis) in the screen throughout the lifecycle of the webpage rendering. For each layer, the browser fills the individual pixels for the visible elements using the same or different threads (a process which is called “Rasterization”). The layers are then combined and painted one by one on the screen by the browser.
We can see the sequence in the “Layers” section of the DevTools.
The browsers then send these layer sequence, by breaking them into different individual tiles, to the CPU (or GPU) to draw them on the screen. This process is known as the “Compositing Operation”.
All these operations are performed by a piece of software known as the “Browser Engine” (also known as “Rendering Engine” or “Layout Engine”). A Browser Engine is the core component of every browser. Some Browser Engine examples: Firefox uses “Gecko”, Chrome and Safari use “WebKit”, Edge and Opera use “Blink”.
Note that the process by which each browser manages the HTML, CSS, and JavaScript and renders the webpage is not standardized. Hence, their browser engines can do things differently. But some processes are common to all of them. I will take the example of “DOM Parsing”.
In simple terms, “DOM Parsing” is the process of reading the HTML source code and constructing a DOM tree out of it in the memory. This action is performed by the DOMParser WebAPI provided by the browsers in the main JavaScript execution thread. The DOMParser class has the parseFromString method using which can parse the HTML source code and convert it into a DOM Tree.
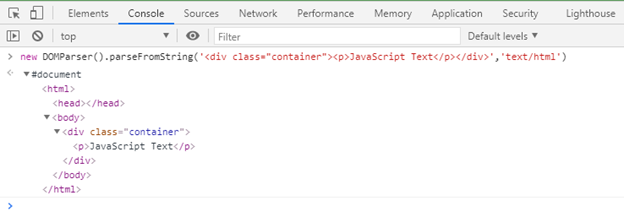
When some characters or the entire HTML document becomes available to the browser, it starts parsing the HTML source code from the top, starts creating the DOM tree incrementally with one node at a time, and starts printing them on the screen. If the browser encounters an external resource e.g. a script file (via <script> tag), a stylesheet file (via <link> tag) or an image file (via <img> tag), it starts to download that resource in the background. Apart from the script files, none of the other files will block the creation of the DOM tree.
That’s all for today.
Hope you liked this blog post and happy learning 🙂