To be honest, whenever I come across any new test automation tool in the market, be it open-sourced or commercial, I feel skeptical about it. Not because I doubt the functionalities, capabilities or (shiny) new features provided by the tool, but whether the tool can add value to both Testing and the Test Engineers. Deciding on the wrong tool can lead to unwanted waste of money, time, and energy. We don’t want that. At a minimum, the tool should have the flexibility to get customized according to our automation need, scale seamlessly for Web/Mobile/API, generate or support to generate good informative reports, can be integrated with the CI servers or other build tools to run in the CICD pipelines, provide re-usability features, support cross-browser testing, can run on any OS platform and require less maintenance.
The free, cloud-hosted, and community-powered TestProject platform has such a complete toolkit built on top of Selenium WebDriver & Appium and it has some well-distributed and reusable test execution and validation features, built-in reporting and report-storing capabilities and a lot of other notable features within it. I have written multiple articles on different topics in the TestProject blog section and also attended some webinars on automation tools and technologies organized by the TestProject team, but never actually tried my hand at the tool itself. Last month, seeing some good new functionalities getting released, I decided to explore the TestProject platform and in this article, I will discuss the TestProject features that stand out the most, according to me. But, before we start, let’s see how to setup TestProject in our system following two simple steps:
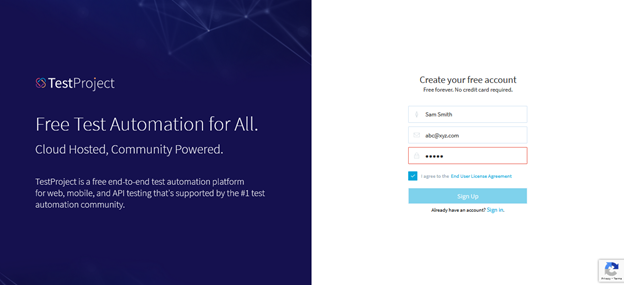
Step1: Open any browser, navigate to the URL (https://app.testproject.io/signup/), and sign up to create a free TestProject account.
Step2: Download, Install, Run and Register a TestProject Agent
I was a little curious about what the “TestProjectAgent” is. Let me explain what it is in simple words. TestProject Agent is a cross-platform locally executable desktop automation component that will communicate with TestProject’s cloud-based repository and will drive your test execution locally or remotely. This desktop component needs to be installed in your system (Windows/macOS/Linux) and you need to register it with your TestProject account. The benefit is that it will do all the heavy lifting of removing the complexities of installation and management of the different drivers/dependencies required to run your Selenium or Appium tests.
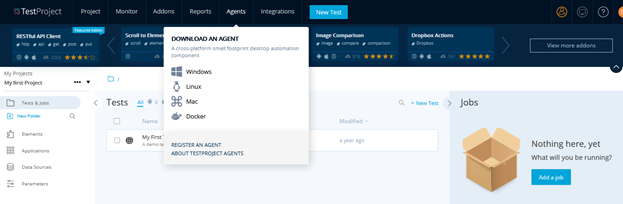
Once downloaded in your local, install the agent following the standard software installation process and start the agent. Once started, it will ask you to authorize. Next you have to register the agent by navigating to the “Agents” tab in the TestProject portal and clicking on the “Register Agent” button.
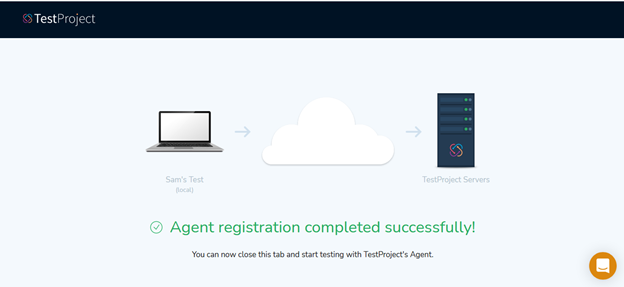
Once, the agent registration is complete, you will see the below screens and that’s all. You don’t need anything else and can start running your tests using TestProject.

Now, since we are done with the setup part, let’s go through the features which caught my attention:
1) OpenSDK (Software Development Kit) in Java, Python, and C#
While experimenting with the featues, one of the best features I have found in TestProject is the “OpenSDK” – a single integrated interface to add Selenium and Appium automation code for Web, Android, and iOS applications. At present, the TestProject OpenSDK implementation supports 3 popular languages – Java, Python, and C#. The advantages of using OpenSDK, as I have found, are:
- We can write our automation code and can customize it according to our requirements.
- We can integrate it with other useful automation libraries if we want to.
- All the complex setup, maintenance, and configuration needed for running the automated tests will be taken care of under-the-hood and we don’t need to bother about those.
- Detailed HTML and PDF test execution reports (with screenshots attached) are automatically generated. We can have both Summary Report and Full Report for the executed tests.
- A collaborative reporting dashboard gets created which will contain execution history and will also have RESTful API support.
- Both local and remote executions can be done seamlessly from any place using the OpenSDK’s Test Runner capabilities.
- Cross-platform support for Mac, Windows, Linux, and Docker is present.
- The tests can be run from any source code management tool (e.g. Git)
- The tests can be integrated with the CICD pipelines.
To start using the OpenSDK, all we need to do is to follow the Installation Steps (mentioned before) and get a “Development Token”, present inside the “Integrations” tab in our TestProject account. To run an automated test in Java using OpenSDK, we have to add the TestProject OpenSDK Maven dependency (in maven pom.xml file) instead of the Selenium dependency.
<dependency>
    <groupId>io.testproject</groupId>
    <artifactId>java-sdk</artifactId>
    <version>0.64.4-RELEASE</version>
</dependency>
If we use Gradle, we have to add the below dependency in the build.gradle file:
compile group: 'io.testproject', name: 'java-sdk', version: '0.64.4-RELEASE'Following is a sample test using the OpenSDK:
package com.seleniumCapabilities.demo;

import java.io.File;
import java.util.HashMap;
import java.util.Map;
import org.openqa.selenium.By;
import org.openqa.selenium.Platform;
import org.openqa.selenium.Proxy;
import org.openqa.selenium.chrome.ChromeOptions;
import org.openqa.selenium.remote.CapabilityType;
import org.openqa.selenium.remote.DesiredCapabilities;
import io.testproject.sdk.drivers.web.ChromeDriver;

public class SampleOpenSDKTest {
     public static void main(String[] args) throws Exception {
         String browserDriverPath = System.getProperty("user.dir") + File.separator + "drivers" + File.separator;
         System.setProperty("webdriver.chrome.driver", browserDriverPath + "chromedriver.exe");
         ChromeOptions chromeOptions = new ChromeOptions();
         chromeOptions.addArguments("—start-maximized");
         ChromeDriver driver = new ChromeDriver("<your TestProject SDK  Developer Token>", chromeOptions);
         driver.get("https://example.testproject.io/web/");
         driver.findElement(By.id("name")).sendKeys("Sam");
         driver.findElement(By.id("password")).sendKeys("12345");
         driver.findElement(By.id("login")).click();
         boolean passed = driver.findElement(By.cssSelector("#logout")).isDisplayed();
         passed?System.out.println("Test Passed"):System.out.println("Test Failed");
        driver.quit();
    }
}
By default, the locally installed TestProject Agent will communicate with the local Selenium or Appium server, run the tests, generate and store the reports in the central cloud-based repository. To perform remote execution, we have to initialize a remote driver for cloud providers (like SauceLabs, BrowserStack). In that case, we also need to set and pass a custom capability (cloud:URL) like below:
import io.testproject.sdk.drivers.web.ChromeDriver;
import io.testproject.sdk.drivers.TestProjectCapabilityType;

ChromeOptions chromeOptions = new ChromeOptions();
chromeOptions.setCapability(TestProjectCapabilityType.CLOUD_URL, "https://{USERNAME}:{PASSWORD}@ondemand.us-west-1.saucelabs.com:443/wd/hub");
ChromeDriver driver = new ChromeDriver(chromeOptions);
2) Reports
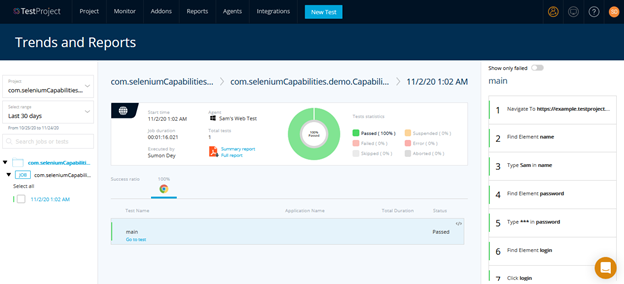
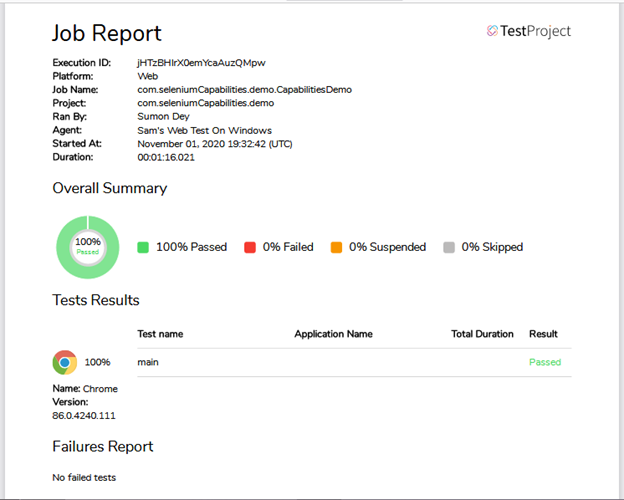
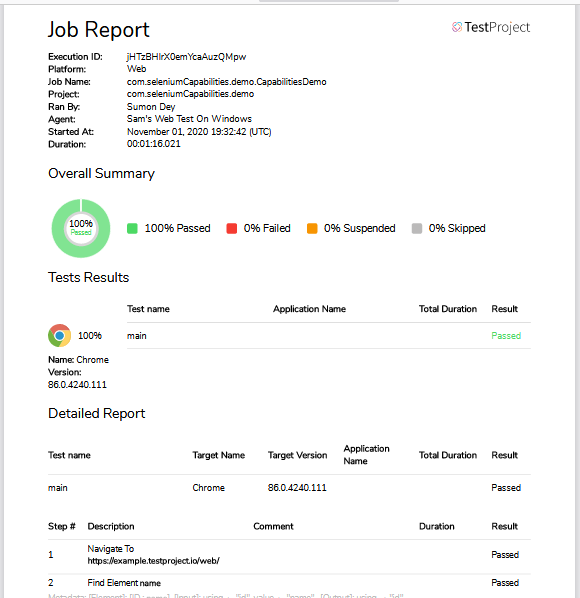
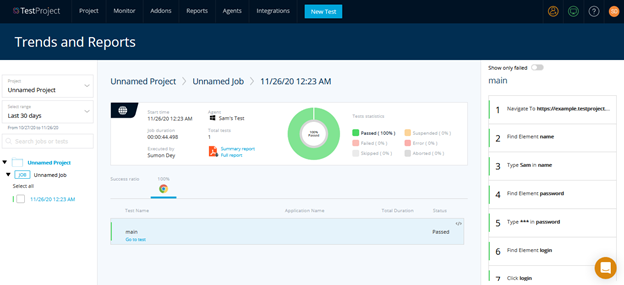
The second feature that has attracted my attention is the “Reporting” capability that TestProject is providing. Generating reports that can deliver valuable information regarding the automated test execution, is important and is a crucial part of any Test Automation framework. Since Selenium WebDriver or most of the other automation libraries/tools do not have in-built reporting capabilities, we have to use external libraries/packages and write code to customize the reporting according to the business intent. By default, TestProject provides a couple of beautifully detailed reports – “Summary Report” (containing Test Execution Summary and Failed Steps) and “Full Report” (containing all Execution information), in the form of HTML, PDF, link/URL and the reports can be extracted via RESTful API too. Also, we don’t need to write any extra code to add Screenshots for the tests. Screenshots will get attached to the reports automatically once the execution gets completed. Below is the Reporting dashboard (with the generated reports) for the test that I ran using TestProject:
Summary Report:
Full Report:
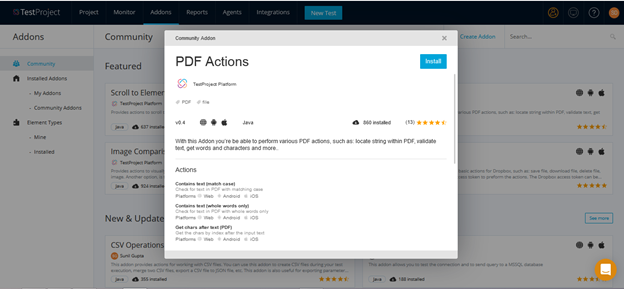
3) Add-Ons
The next feature which I felt very unique is the “Addons” feature that TestProject is providing as it involves community contribution from the Global Testing Community. The TestProject addons is a set of reusable coded actions that can be integrated into our tests. The addons set is not only a collection of free automation solutions built by some brilliant minds in the Test Automation community but also is a great way to encourage lots of people from the community to develop new functionalities that can be plugged into the free TestProject platform for other people to use. Some of the popular addons are:
- Scroll to Element
- PDF Actions
- Image Comparison
- Dropbox Actions
- RESTful API Client
- Screenshot Utils
- Geolocation Utils
- Random Values From CSV File
- File Uploader
- Reporting Utilities
- Send Email
Take an example of the “PDF Actions” addon. With this addon, we can perform various PDF actions such as locating string within PDF, validating text, or retrieving words/characters from the PDF. Once we click on the “Install” button, all the capabilities provided by this addon will be available for our tests.
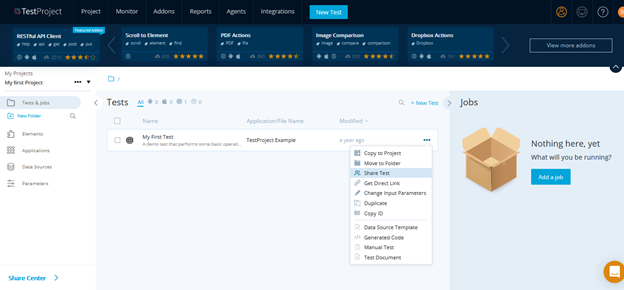
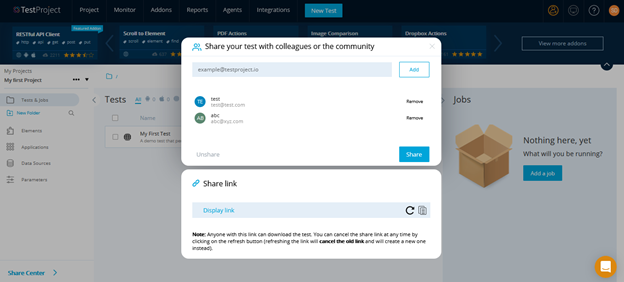
4) TestProject Share Center
One of the most recent features introduced in TestProject is the “TestProject Share Center”. Using this feature, with a single click, we can easily collaborate and share our Web, Mobile, and API tests with anyone across the globe in a matter of seconds, either through email or through a unique shared link. It might be the dev team, the BAs, the test team, or managers who can utilize and manage the tests from their TestProject account.
To share a test, we can follow the steps mentioned below:
Step1: Open the Context menu of the test to share and click on “Share Test”
Step2: We can either add the person(s)’s email (with whom we want to share the test) or we can get the link and share the link with them
5) AI-Powered Self-Healing Technology
Being an ML and AI enthusiast, another TestProject feature that drew my attention is the “AI-Powered Self-Healing Technology” present inside TestProject’s Selenium-based Smart Test Recorder. Since TestProject is built on top of Selenium, you can get the benefits of Selenium with additional AI features to save a bunch of time and overcome the most common testing challenge of locating elements. The word “Self-Healing” has been used here in the sense that once a test is recorded and an automation script is generated, then later, if there is a UI change with a direct effect on the automation script, this technology within the Test Recorder will ensure that the test does not break during the next run even though the UI has changed. At present, the technology supports dynamic elements, iFrames, Pop-ups, Custom Attributes, Multiple Windows/Tabs, Adaptive Wait, and Hovering Menu items.
When recording a test, the tester will be notified if there is a better way to run the test and she/he can review and confirm the proposed changes. During execution, if the self-healing mechanism has been used to recover from an exception, then an indicative icon will get appeared in the Test Execution Reports.
Using this mechanism, TestProject can monitor and select the most robust element locator strategy before the test starts and if needed, can also repair the tests during execution. This will lead to improved performance and execution time, quick test creation, web element identification, non-flaky tests and test debugging.
6) Integration with Cucumber, JUnit/TestNG and ExtentReport
Another good thing I liked about TestProject is that we can write our automation code, integrate any library of our choice, and later can utilize the TestProject in-built capabilities for more customization. This provides more flexibility. Take an example of using TestProject SDK with Cucumber, JUnit/TestNG, and ExtentReport where we can write our tests using Selenium and view/share the reports and results in the TestProject platform. Also in this case, since we are using TestProject’s OpenSDK, we don’t need to maintain the browser drivers (e.g. ChromeDriver, GeckoDriver).
We just need to make a small change – instead of the Selenium dependency, we have to use TestProject SDK dependency (along with Cucumber, TestNG, and ExtentReport dependencies) in our pom.xml or build.gradle file.
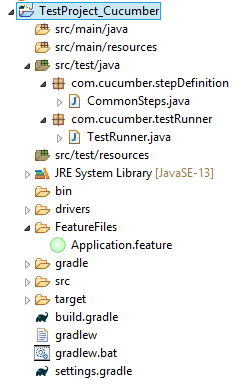
I created a sample Java project (project structure diagram below) and added a Cucumber scenario in the Feature file. The scenario got executed successfully and the detailed report got published in the TestProject “Trends and Reports” section.
Conclusion
The features mentioned above are some of those which stood out and caught my attention. There are lots of other features too like record and play, test job creation and scheduling, parameteriztion in tests, performing validations after locating elements and performing actions etc. I liked the official documentation too which is very concise, clear and will be easy for anyone to go through and understand. My approach towards tool has always been to explore the tool first and extract out the best features out of it and I can say that TestProject certainly has quite a few standout features.