In this blog post, I will be explaining everything you need to know about MySQL. You can treat this as a complete tutorial too and refer to it whenever and wherever you want.
INTRODUCTION
MySQL is probably the world’s most popular open-source Relational Database Management System (RDBMS) right now and is developed, distributed, and supported by Oracle. A Database (DB) is a collection of a structured and interrelated set of data, having an accessible interface. The interface is DBMS (Database Management System) – a software program that allows us to interact with the DB and it does all the talking with DB for us. For MySQL (and for most of the other relational database systems), the language which is used to interact with the DB is SQL (Structured Query Language), which I will discuss in detail in the later sections. Some other examples of Relational Database Management Systems are as follows:
PostgreSQL
OracleDB
SQLite
MariaDB
Microsoft SQL Server
Each of them offers unique features and uses SQL queries (which can be considered as standard language for RDBMS) to access and manipulate data in the DBs.
INSTALLATION
Installing MySQL in your system might seem intimidating at first and you might run into several issues during the installation process. But for most of you, the installation process should go smooth if you follow the steps I will be mentioning below. If you are facing issues, I would suggest you visit the official installation documentation page and go through the installation pre-requisites.
Step1:
Go to the official MySQL Community Download page.
Select the Operating system from the dropdown (I will be installing it on Windows) and then select the second download option (i.e. Windows (x86, 32-bit), MSI Installer) to download.
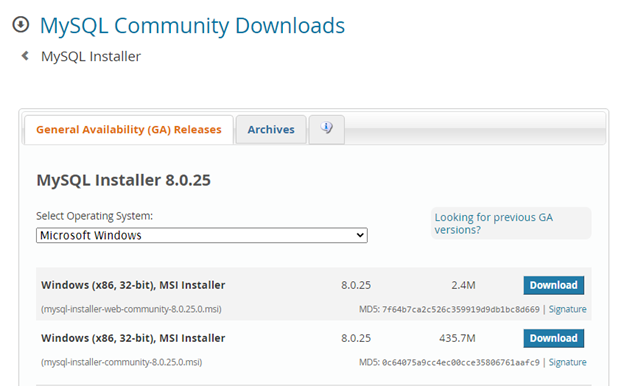
On the next page, click on “No thanks, just start my download.” and save the downloaded msi in your local file system.
Step2:
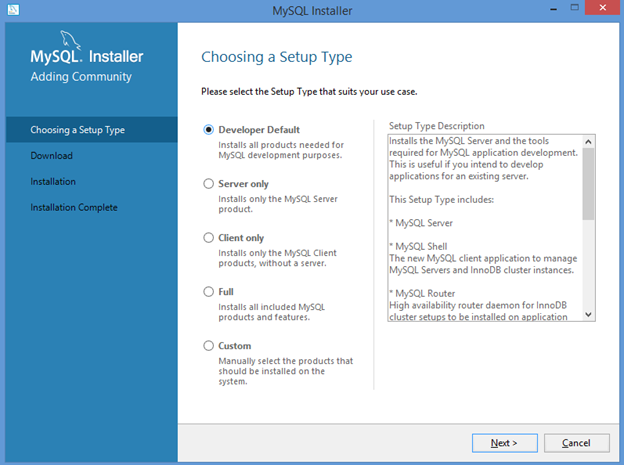
Run the downloaded and saved Windows Package Installer (.msi) by double-clicking on it. A “MySQL Installer” window should open up.
Select the “Developer Default” radio button and click on “Next >”
Step3:
Based on your system’s software availability for MySQL to work, it will prompt you to check the requirements. Click on “Next >” and then click on “Execute”. This will download and install all the required packages.

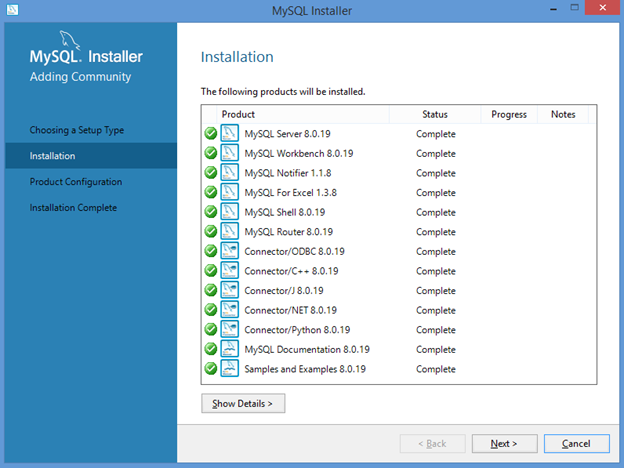
Wait for all the installations to get completed and then click on the “Next >” button.
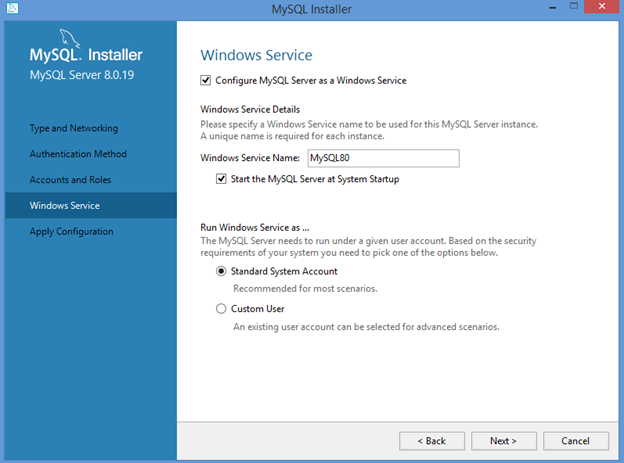
Step4:
Again click on the “Next >” button.

Step5:
Select the “Development Computer” option from the “Config Type” dropdown and click on the “Next >” button. You don’t necessarily need to make any other changes here.

Step6:
Again click on the “Next >” button

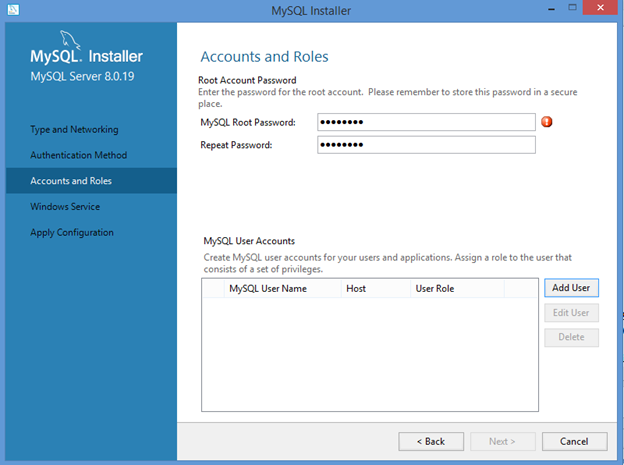
Step7:
Provide a root password. Add a user account.
Step8:
Click on the “Next >” button
Step9:
Click on the “Finish” button to continue the installation process
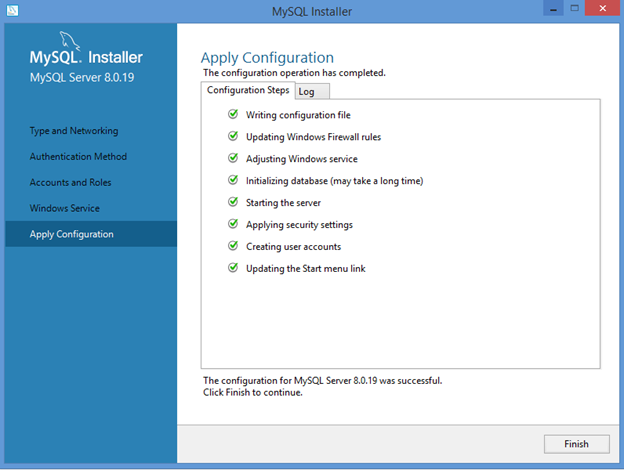
Step10:
Click on the “Next >” button
Step11:
Click on the “Finish” button
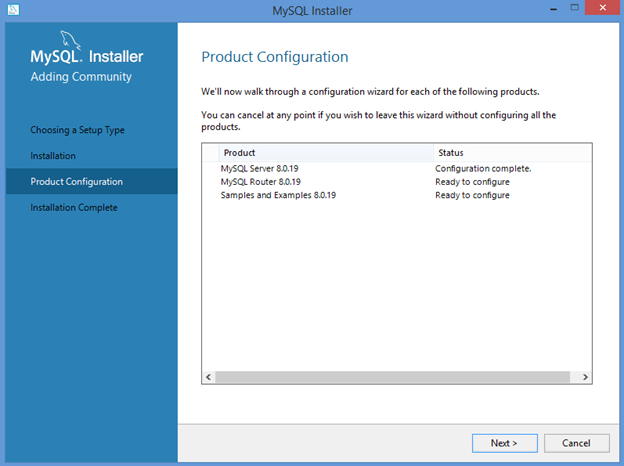
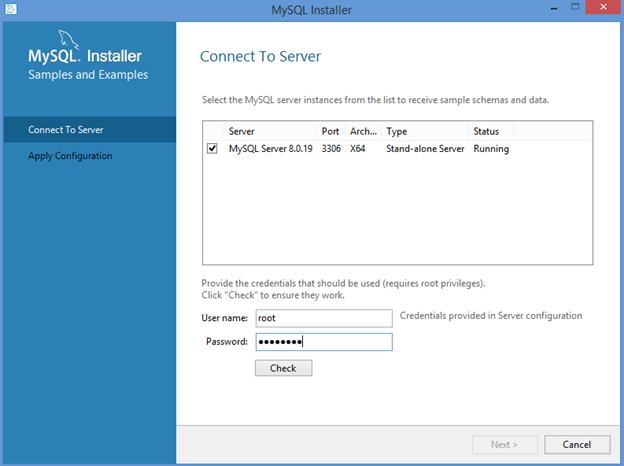
Step12:
Enter the root password and click on the “Check” button
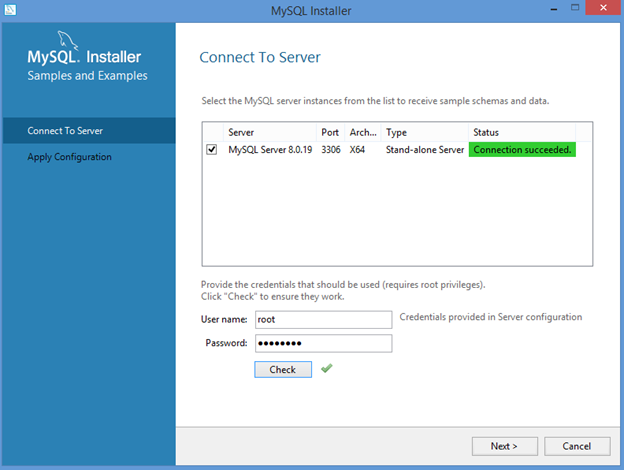
Step13:
The connection will get established (can be seen in the area in green) and then click on the “Next >” button
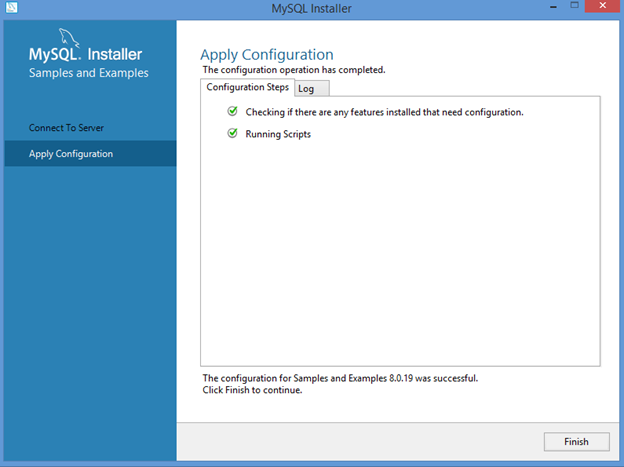
Step14:
Click on the “Finish” button
Step15:
Again click on the “Finish” button
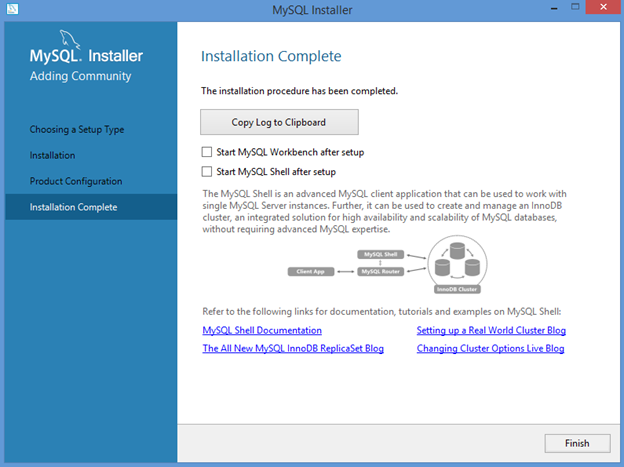
Congrats!! This will complete the MySQL installation process and you will be ready to start working with MySQL.
Creating Databases and Tables in MySQL Database Server
During installation, you have started the MySQL Database Server and now you will be creating databases inside that server.
To run the SQL queries, you can either use the “MySQL Workbench” or the “MySQL Command Line Client”.
Throughout this tutorial I will be using the “MySQL Command Line Client” and you can search for it in your system to start working on it. Once you open the “MySQL Command Line Client”, to start hitting the SQL queries, you have to log in to the MySQL server by entering the password you created before and you will be ready to go.

Let’s first see what all databases are already present in the running MySQL Server by default:
To display this in the client console, fire the below query:
SHOW DATABASES;
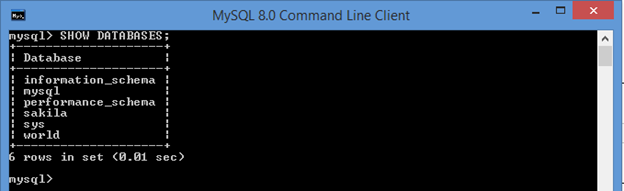
This shows all the databases present and as you can see from the image above, there are 6 databases that are present in the MySQL Server. We will not work with them but will create and manipulate our own DBs in the server.
To create a new DB, use the below query format:
CREATE DATABASE <dbName>;
where, <dbName> is the name of the DB that you want to create. The name must only consist of the letters a to z (can be both lower and upper case), numbers 0 to 9, and the underscore (_) or the dash (-) symbol. This also means that any non-ASCII database names are not allowed and also the database names must always start with a letter.
Example:
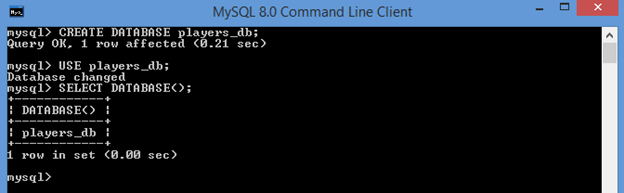
CREATE DATABASE players_db;

To use the newly create DB (named “players_db”), hit the below query:
USE players_db;
This will point to the “players_db” database for you to start working on.
To confirm the selection and to display the DB where you are currently in, use the query:
SELECT DATABASE();
Note: To clear the client console anytime, you can either use the command “system cls” or the command “\! cls”‘ (in Windows)
Let’s now create a table in the “players_db” database. A DB “Table” is a structure that organizes the data into rows and columns – forming a grid and we will mostly be working with them. DB Tables are at the heart of the relational DBs and every RDBMS is just a collection of DB Tables. The tables hold the data in a structured format within a DB. “Columns” are the headers in the DB tables and “Rows” (sometimes referred to as “Records”) are the actual data present in the tables.
To create a new table, let’s write and fire a query with the below format:
CREATE TABLE <tableName>(
<columnName1> <data_type>,
<columnName2> <data_type>
);
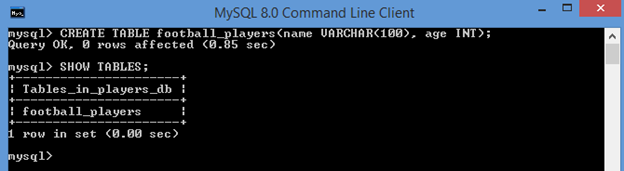
Our query:
CREATE TABLE football_players(
football_players_id INT,
first_name VARCHAR(20),
last_name VARCHAR(20),
age INT
);
You can use either of the below queries
SHOW TABLES;
SHOW TABLES FROM players_db;
– to display all the tables currently present in the “players_db” database;
Note that, in the create table query, “VARCHAR” and “INT” have been used. These are the MySQL data types.
MySQL has 3 data types categories:
1) Numeric Data Types
2) String Data Types
3) Date Data Types
The most important data types are INT, CHAR and VARCHAR
int
– It is a whole number (signed and unsigned) e.g. 42, 99, -245
– It is by default signed, INT (which is shorthand for INT SIGNED) therefore has the MAX VALUE of 2147483647. INT UNSIGNED is 0 to 4294967295. We have to explicitly modify INT to get a different range. This is the same with all integer types. They are both INT, but they are not technically the same. They are both integers of type INT; so you could say 4294967295 is the largest available INT value.
– The largest integer (of any type) available in MySQL (currently) is BIGINT UNSIGNED at 9,223,372,036,854,775,807.
char
– It is a fixed-length string
varchar
– It is a variable-length string, ranging between 1 and 255 characters e.g. ‘coffee’,’-9999’, ‘xxsc fsfdf’
– varchar(20) denotes a varchar with a maximum length of 20.
A CHAR is a string, as is VARCHAR; but it behaves differently than VARCHAR. One has a set amount of memory (CHAR), the other can modify its memory footprint (VARCHAR). They’re both strings but they behave differently, because of this modification.
To delete the “football_players” table, use the query:
DROP TABLE football_players;
To delete multiple tables together, use the query format:
DROP TABLE <tableName1>,<tableName2>;

To delete the “players_db” database, use the query:
DROP DATABASE players_db;

Assigning Constraints in Tables
While creating a table you can add constraints like whether a column should only hold “NOT NULL” values, get populated with a “DEFAULT” value, is a “PRIMARY KEY” or whether its values should get automatically incremented with every record insertion using the constraint “AUTO_INCREMENT”
Example:
CREATE TABLE football_players(football_players_id INT NOT NULL AUTO_INCREMENT PRIMARY KEY, first_name VARCHAR(20), last_name VARCHAR(20), age INT);
– here, the football_players_id column can hold data of type INT, cannot hold NOT NULL data, is the primary key of the table and gets auto incremented upon row/record insertion.
– the “first_name” column can hold data of type VARCHAR with a maximum length of 20
– the “last_name” column can hold data of type VARCHAR with a maximum length of 20
– the “age” column can hold data of type INT
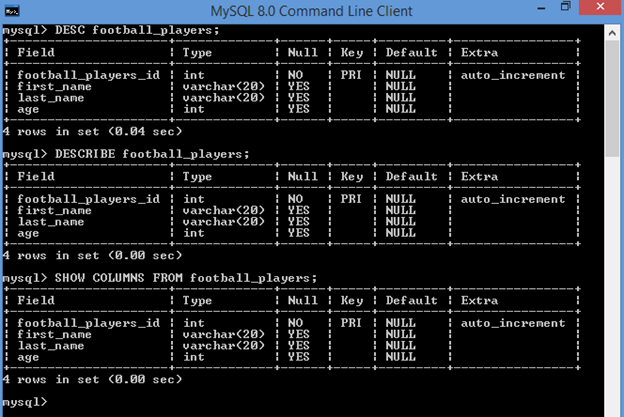
You can use the below queries to display all the columns of the “football_players” table with other information:
DESC football_players;
DESCRIBE football_players;
SHOW COLUMNS FROM football_players;
Adding data into a Table (using INSERT query)
You can add data into a table using the INSERT query.
To insert data for a single row and in all the columns of a table (without mentioning the column names), use the below query format:
INSERT INTO <tableName> VALUES(columnName1Value, columnName2Value,…,columnNameNValue);
Example:
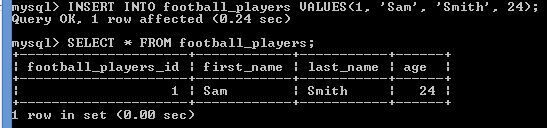
INSERT INTO football_players VALUES(1, ‘Sam’, ‘Smith’, 24);
To view all the data we inserted just now in the “football_players” table, you have to use the “SELECT” query:
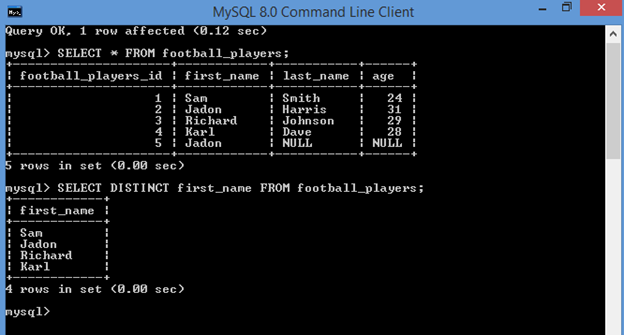
SELECT * FROM football_players;
We will talk more about “SELECT” queries in the upcoming sections.
To insert data in a single row and in all the columns of a table (mentioning the column names), use the below format:
INSERT INTO <tableName>(columnName1,columnName2,…,columnNameN) VALUES(columnName1Value, columnName2Value,…,columnNameNValue);
Example:
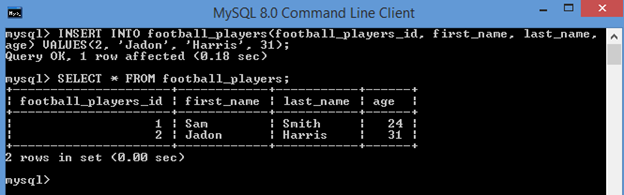
INSERT INTO football_players(football_players_id, first_name, last_name, age) VALUES(2, ‘Jadon’, ‘Harris’, 31);
To insert data in multiple rows together and in all the columns, use the below format:
INSERT INTO <tableName>(columnName1, columnName2,… columnNameN) VALUES(columnName1Value1, columnName2Value1,.. columnNameNValue1),( columnName1Value2, columnName2Value2,.. columnNameNValue2);
Example:
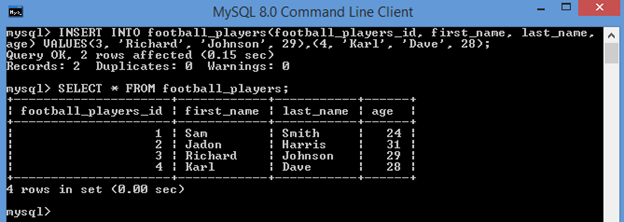
INSERT INTO football_players(football_players_id, first_name, last_name, age) VALUES(3, ‘Richard’, ‘Johnson’, 29),(4, ‘Karl’, ‘Dave’, 28);
Retrieve and Display data from a Table (using SELECT query)
We have seen earlier how we can retrieve all the data from all the records in a table using the query:
SELECT * FROM football_players;
– here * represents all the columns in the table
To display the data only from particular columns, we can use the below query format:
SELECT <columnName1>, <columnName2> FROM <tableName>;
Example:
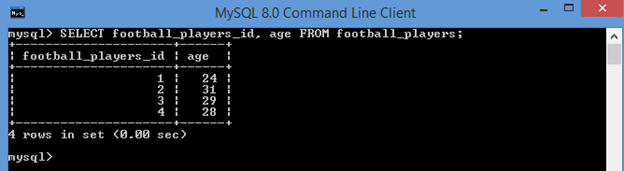
SELECT football_players_id, age FROM football_players;
To fetch according to the uniqueness of the stored data, we can use the below query formats:
SELECT DISTINCT <columnName> FROM <tableName>;
SELECT DISTINCT <columnName1>, <columnName2> FROM <tableName>;
To demo this, let’s first insert a record with a duplicate “first_name” value in the “football_players” table and then use the below query:
SELECT DISTINCT first_name FROM football_players;
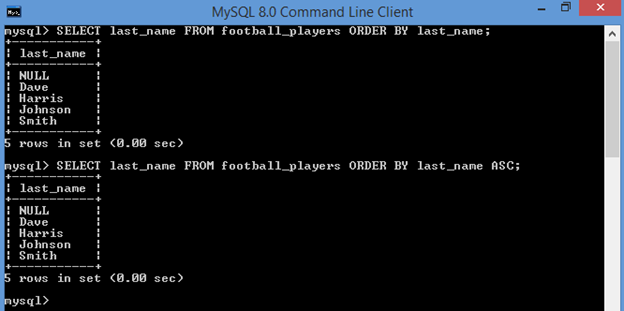
SELECT last_name FROM football_players ORDER BY last_name;
– this will display the “last_name” data from all the rows
– By default, it will be displayed in its ascending order
The query “SELECT last_name FROM football_players ORDER BY last_name ASC;” will display the same result.
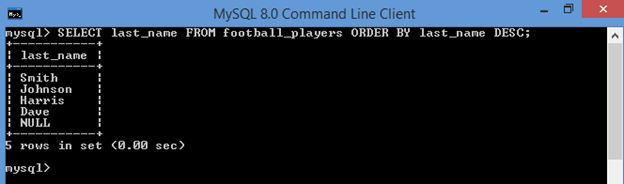
SELECT last_name FROM football_players ORDER BY last_name DESC;
– this will display the “last_name” data from all the rows (in descending order)
SELECT football_players_id, first_name, last_name, age FROM football_players ORDER BY age DESC;
– this will display the “football_players_id”, “first_name”, “last_name” and “age“ data from all the rows (according to the descending order of the “age” field)

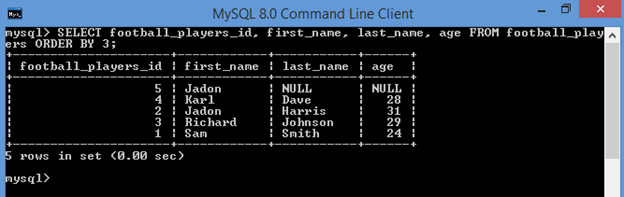
SELECT football_players_id, first_name, last_name, age FROM football_players ORDER BY 3;
– This will display the “football_players_id”, “first_name”, “last_name” and “age“ data from all the rows (according to the ascending order of the “last_name” field because its index is 3 in the query)
SELECT * FROM football_players LIMIT 2;
– This will display the first 2 row data from all the “football_players_id”, “first_name”, “last_name” and “age“ fields

SELECT * FROM football_players ORDER BY age DESC LIMIT 2;
– This will display all the data from the first 2 rows after the data is arranged based on the descending order of the “age” field

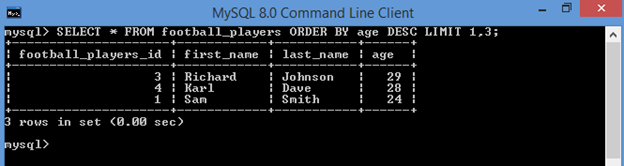
SELECT * FROM football_players ORDER BY age DESC LIMIT 1,3;
– This will display all the data from the first 3 rows after the data is arranged based on the descending order of the “age” field-
SELECT * FROM football_players WHERE age LIKE ‘2%’;
– This will display all the data from the rows where the “age” field value starts with 2

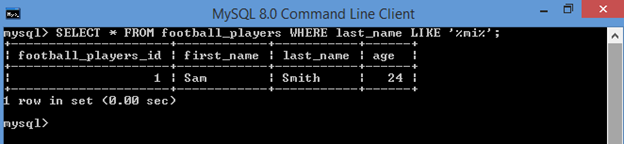
SELECT * FROM football_players WHERE last_name LIKE ‘%mi%’;
– This will display all the data from the rows where the “last_name” field value contains the string “mi”
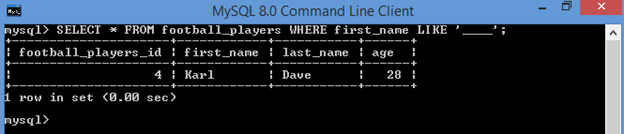
SELECT * FROM football_players WHERE first_name LIKE ‘____’;
– Here there are four underscores and each underscore stands for exactly 1 character
– This will display all the data from the rows where the “first_name” field value has exactly 4 characters
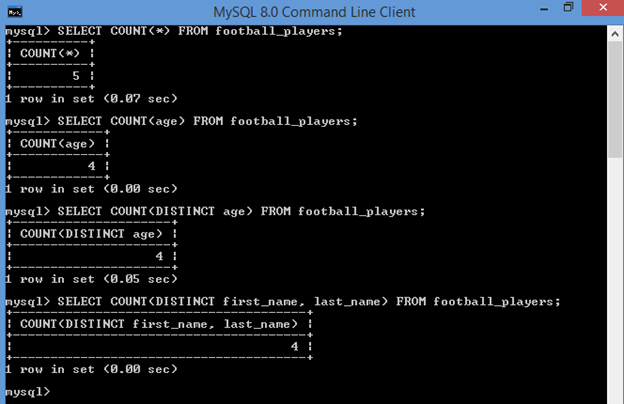
SELECT COUNT(*) FROM football_players;
SELECT COUNT(age) FROM football_players;
SELECT COUNT(DISTINCT age) FROM football_players;
SELECT COUNT(DISTINCT first_name, last_name) FROM football_players;
– These queries will give you the count of data for the fields (with conditions) present between the parentheses.
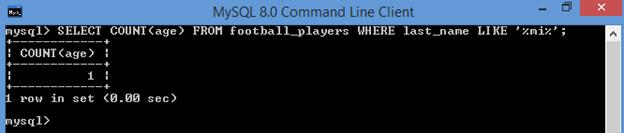
SELECT COUNT(age) FROM football_players WHERE last_name LIKE ‘%mi%’;
– This will display count of data for the “age” field where the “last_name” field value contains the string “mi”
Grouping the rows in a Table (using the GROUP BY query)
The “GROUP BY” statement groups rows that have the same values into summary rows.
Example:
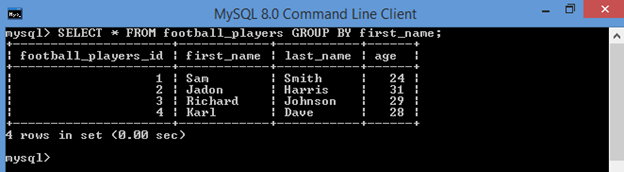
SELECT * FROM football_players GROUP BY first_name;
– This will display data from all the fields after grouping the rows which have same “first_name” field value
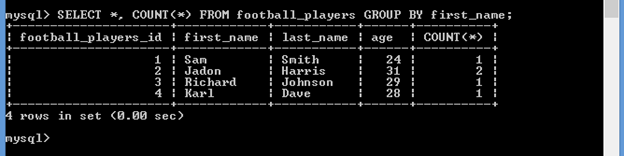
SELECT *, COUNT(*) FROM football_players GROUP BY first_name;
– This will display data from all the fields (as well as the count) after grouping the rows which have same “first_name” field value
SELECT MIN(age) FROM football_players;
– This will display the minimum “age” field value from the table
SELECT MAX(age) FROM football_players;
– This will display the maximum “age” field value from the table

String Functions
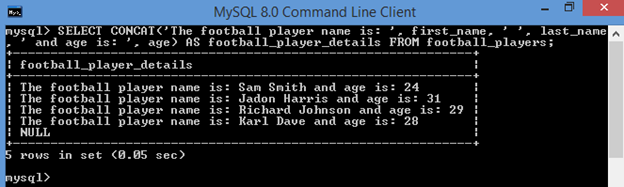
SELECT CONCAT(‘The football player name is: ’, first_name, ‘ ’, last_name, ‘ and age is: ’, age) AS football_player_details FROM football_players;
– The “CONCAT” function will add two or more expressions together
– The expressions are separated by commas
– The “AS” command is used to rename the newly-formed column (after concatenation) with an alias
SELECT CONCAT_WS(‘ | ’, first_name, last_name , age) FROM football_players;
– The “CONCAT_WS” function adds the expressions together by appending a separator (e.g. “|”) between them
– If the separator is NULL, then this function will return NULL

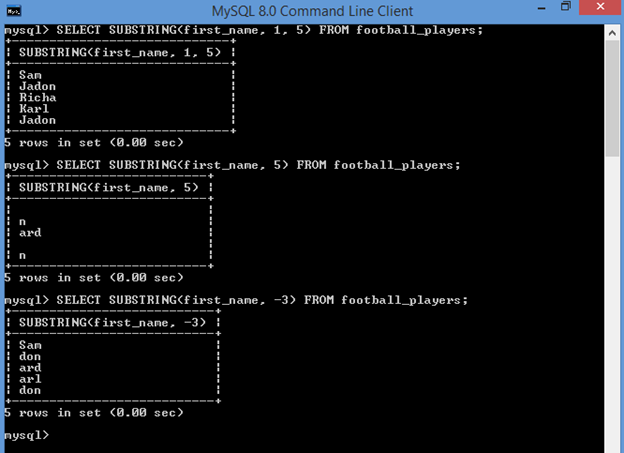
SELECT SUBSTRING(first_name, 1, 5) FROM football_players;
SELECT SUBSTRING(first_name, 5) FROM football_players;
SELECT SUBSTRING(first_name, -3) FROM football_players;
– The “SUBSTRING” function extracts a substring from a string
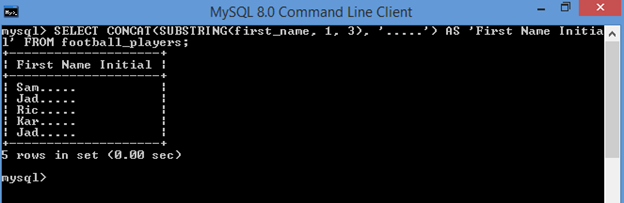
SELECT CONCAT(SUBSTRING(first_name, 1, 3), ‘…’) AS ‘First Name Initial’ FROM football_players;
– This query first extracts the substring, then concats the output with “…” and then adds the alias ‘First Name Initial’ to the resultant column
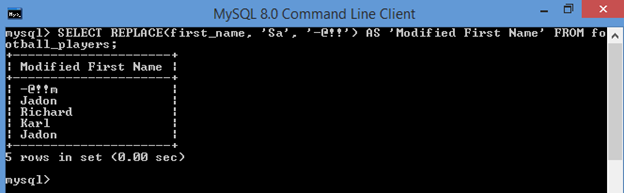
SELECT REPLACE(first_name, ‘Sa’, ‘-@!!’) AS ‘Modified First Name’ FROM football_players;
– The “REPLACE” function replaces part of a string with another string
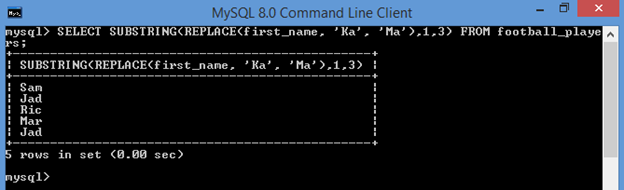
SELECT SUBSTRING(REPLACE(first_name, ‘Ka’, ‘Ma’),1,3) FROM football_players;
– In this query, at first, a part of the “first_name” field value is replaced and then a substring is extracted from the resultant value after the “REPLACE” function is called.
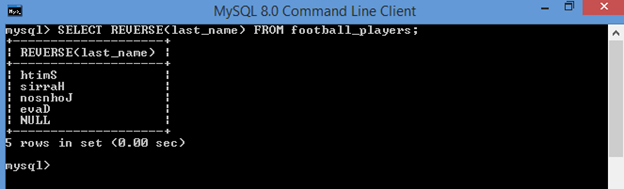
SELECT REVERSE(last_name) FROM football_players;
– The REVERSE function reverses the string value passed inside it and returns the result
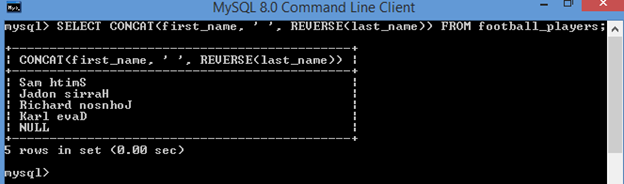
SELECT CONCAT(first_name, ‘ ’, REVERSE(last_name)) FROM football_players;
– This query reverses the “last_name” field value, concatenates it with a whitespace and “first_name” field value and displays the result
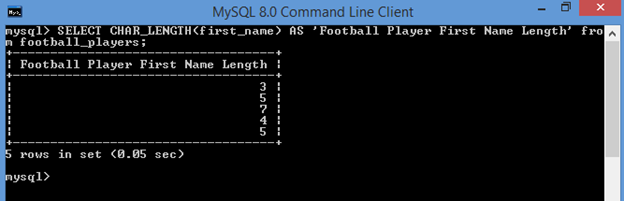
SELECT CHAR_LENGTH(first_name) AS ‘Football Player First Name Length’ FROM football_players;
– The “CHAR_LENGTH” function returns the length (number of characters) in the passed string value
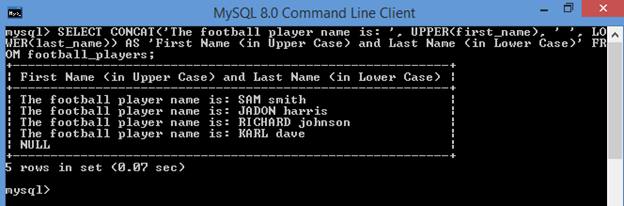
SELECT CONCAT(‘The football player name is: ’, UPPER(first_name), ‘ ’, LOWER(last_name)) AS ‘First Name (in Upper Case) and Last Name (in Lower Case)’ FROM football_players;
– The “UPPER” and “LOWER” functions convert the passed string value to its uppercase and lowercase values respectively
SubQueries
– A MySQL Subquery is a query that is nested within another query.
– The subquery is also called “Inner query” and the query within which it is nested is called “Outer query”
– A subquery can be nested inside another subquery
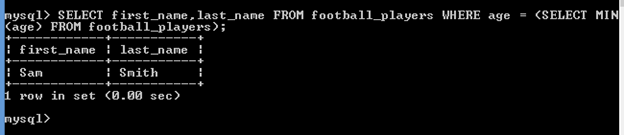
SELECT first_name,last_name FROM football_players WHERE age = (SELECT MIN(age) FROM football_players);
– In the above query, the subquery outputs the minimum age from the table and the result is then queried with the “WHERE” clause to find the “first_name” and “last_name” of the football player who is the youngest.
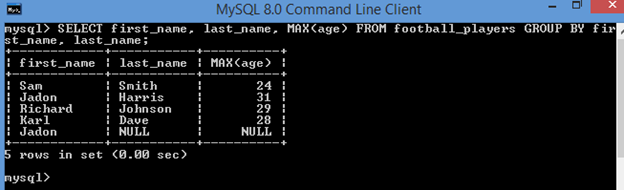
SELECT first_name, last_name, MAX(age) FROM football_players GROUP BY first_name, last_name;
– The above query is another way to find the maximum age from the table after the “first_name” and “last_name” are grouped.
SELECT SUM(age) AS ‘Sum of ages’ FROM football_players;
– The “SUM” function adds all the values from the “age” field and displays the result under the column alias “Sum of ages”

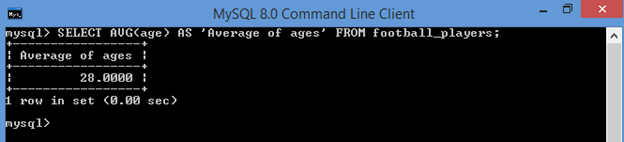
SELECT AVG(age) AS ‘Average of ages’ FROM football_players;
– The “AVG” function calculates the average of all the values from the “age” field and displays the result under the column alias “Average of ages”
– The average calculation precision is 4 decimal points
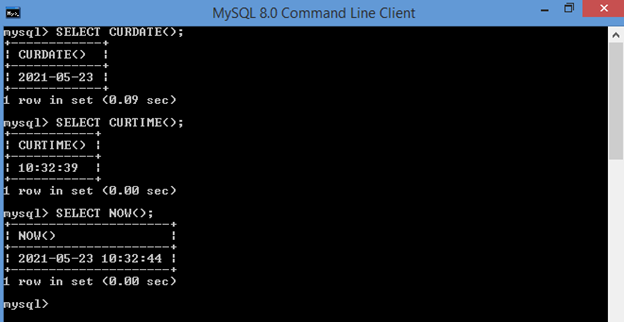
SELECT CURDATE();
– The “CURDATE” function returns the current date as “YYYY-MM-DD” (string) or as YYYYMMDD (numeric)
SELECT CURTIME();
– The “CURTIME” function returns the current time as “HH-MM-SS” (string) or as HHMMSS.uuuuuu (numeric)
SELECT NOW();
– The “NOW” function returns the current date and time as “YYYY-MM-DD HH-MM-SS” (string) or as YYYYMMDDHHMMSS.uuuuuu
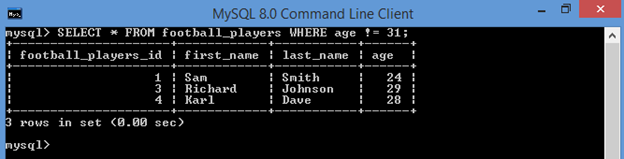
SELECT * FROM football_players WHERE age != 31;
– This query fetches data from all the columns for rows where the “age” field value is not equal to 31
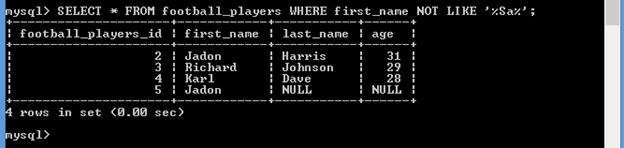
SELECT * FROM football_players WHERE first_name NOT LIKE ‘%Sa%’;
– This query fetches data from all the columns for rows where the “first_name” field value does not contain the string ‘Sa’ in it
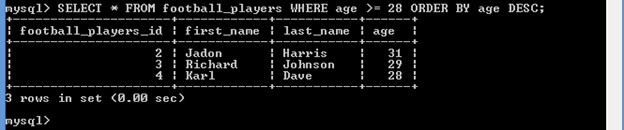
SELECT * FROM football_players WHERE age >= 28 ORDER BY age DESC;
– This query fetches data from all the columns for rows where the “age” field value is greater then 28 and the data is displayed according to the descending order of the “age” field value
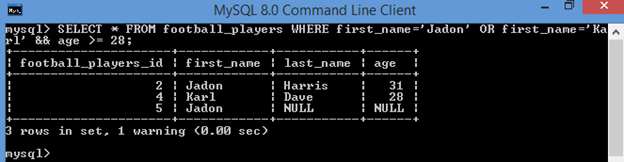
SELECT * FROM football_players WHERE first_name=’Jadon’ OR first_name=’Karl’ && age >= 28;
– This query fetches data from all the columns for rows where the “first_name” field value is “Jadon” or “Karl” and the “age” field value is greater than/equal to “28”
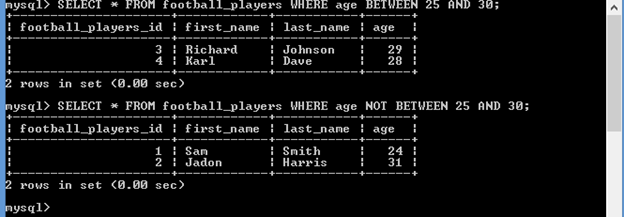
SELECT * FROM football_players WHERE age BETWEEN 25 AND 30;
– This query fetches data from all the columns for rows where the “age” field value is between “25” and “30”
SELECT * FROM football_players WHERE age NOT BETWEEN 25 AND 30;
– This query fetches data from all the columns for rows where the “age” field value is not between “25” and “30”
SELECT CAST(‘2021-05-23’ AS DATETIME);
– The “CAST” function converts a value from one data type to another data type specified in the expression inside
– The above query converts the string value “2021-05-23” to the “DATETIME” type

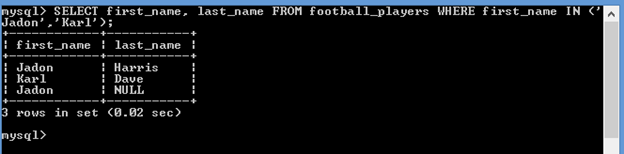
SELECT first_name, last_name FROM football_players WHERE first_name IN (‘Jadon’,’Karl’);
– This query fetches data from the columns “first_name” and “last_name” for rows where the “first_name” field value is between the string values “Jadon” and “Karl”
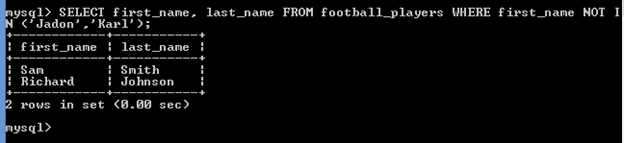
SELECT first_name, last_name FROM football_players WHERE first_name NOT IN (‘Jadon’,’Karl’);
– This query fetches data from the columns “first_name” and “last_name” for rows where the “first_name” field value is not between the string values “Jadon” and “Karl”
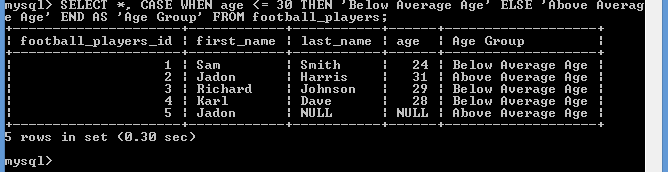
SELECT *, CASE WHEN age <= 30 THEN ‘Below Average Age’ ELSE ‘Above Average Age’ END AS ‘Age Group’ FROM football_players;
– this query retrieves data from all the columns after checking whether the “age” field value is equal to/less than “30”. If yes, then it adds the string “Below Average age” otherwise it adds the string “Above Average Age” to a new column with alias “Age Group”
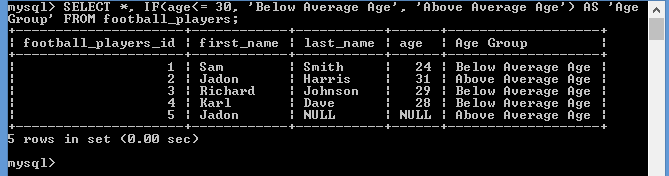
SELECT *, IF(age<= 30, ‘Below Average Age’, ‘Above Average Age’) AS ‘Age Group’ FROM football_players;
– this query is similar to the previous one, difference is that it uses “IF” function instead of the “CASE”
– this query retrieves data from all the columns after checking whether the “age” field value is equal to/less than “30”. If yes, then it adds the string “Below Average age” otherwise it adds the string “Above Average Age” to a new column with alias “Age Group”
That’s all for now. Hope you enjoyed this tutorial. Do share this with your friends and colleagues who might get some help out of it.
If you have any query or need any help/assistance/mentorship, feel free to contact me.